Rewards


Growing your own weed at home can be a fulfilling and relaxing hobby, even if you don’t have fancy equipment. So, if you’re curious how to grow weed at home without equipment — you’re in the right spot.
Not only does cultivating your own cannabis crop save you money, but it also gives you total control over the quality of your herb. Plus, there are some great benefits to cultivating without any equipment. It pushes you to embrace sustainability and minimalism, which are both awesome for the environment and your peace of mind.
In this blog, you’ll learn about the perks of home-growing weed, how to do it with minimal tools, and why going equipment-free can be a game-changer. Let’s dive into the basics and get you started on your next grow!
Understanding Basics of Weed Cultivation


Before you start growing, it’s essential to get a grasp on the basics of weed cultivation.
First off, the cannabis plant lifecycle consists of several stages: germination, seedling, vegetative, and flowering. Each stage requires specific care and attention, from providing the right amount of light and water to adjusting nutrients.
Additionally, different strains have unique growing requirements. Indica strains, for instance, typically grow shorter and bushier, making them ideal for indoor setups, while Sativa strains often reach taller heights and might need extra space. It’s crucial to research and choose strains that fit both your space and desired effects.
Lastly, be sure to check your local laws regarding home cultivation. While some places allow you to grow a few plants for personal use, others may have restrictions or require permits. Understanding these legalities before you dive in can save you lots of headaches down the road.
Selecting the Right Strain
Choosing the right strain is the first big decision on your home-growing journey, especially when you’re going without equipment. Let’s break down the two main types of cannabis strains: Indicas and Sativas, and see which ones are better suited for growing without a lot of gear.
Indicas vs. Sativas: Which is Better for Home Growing Without Equipment?
When it comes to growing weed at home without equipment, Indica strains are usually the go-to choice. Indicas tend to be more compact and bushy, making them manageable in smaller spaces like closets or tiny balconies. They also have shorter flowering times compared to Sativas, which means you get to enjoy your harvest sooner. Their hardiness and resilience make them easier to grow with minimal intervention.
On the other hand, Sativas can be a bit trickier. They often grow tall and lanky, which can be challenging if you don’t have a lot of vertical space. Sativas also usually require a longer flowering period, so patience is key. That said, if you do have the room and time, growing Sativas can reward you with uplifting and cerebral highs that many swear by.
Strains That Flourish with Minimal Intervention
Some strains are simply low-maintenance and ideal for beginner growers. Here are a few that thrive with minimal intervention:
- Northern Lights (Indica): Known for its ease of growth and resistance to common plant problems, Northern Lights is a fantastic choice for newbies.
- Blue Dream (Hybrid): Blue Dream is a balanced hybrid that grows well in a variety of conditions and doesn’t require much special attention.
- Durban Poison (Sativa): If you’re set on growing a Sativa, Durban Poison is relatively easy to care for and can handle some neglect.
Tips for Obtaining Quality Seeds or Clones
Starting with quality seeds or clones is half the battle. Here are some tips to get you started:
- Buy from Reputable Sources: Make sure to purchase your seeds or clones from credible seed banks or local dispensaries. Do a bit of research or ask for recommendations from experienced growers.
- Check Online Reviews: Look for strains with positive feedback from other home growers who have faced similar constraints.
- Go Feminized: Opt for feminized seeds to ensure that you’re growing female plants, which produce the buds you’re after.
- Consider Autoflowering Seeds: These seeds are great for beginners because they automatically switch from the vegetative stage to the flowering stage, saving you the fuss of changing light cycles.
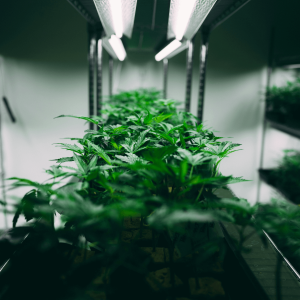
Preparing Your Growing Space
Finding the ideal spot for your home-grown weed is crucial, whether you’re opting to grow weed indoors or outside. If you’re growing cannabis indoors, small spaces like closets, spare rooms, or even under a staircase can work wonders. The key is to ensure the area is clean and has good airflow. For outdoor growing, your backyard or balcony can be perfect, as long as the plants receive ample sunlight and protection from harsh weather.
Natural light is a game-changer in growing weed without equipment. It’s free and, when utilized correctly, provides your plants with the energy they need to grow strong and healthy. Aim for a spot that gets at least 4-6 hours of direct sunlight per day. If natural light is limited, you can always rotate your plants to ensure they get their share.
Keep in mind that creating a makeshift growing environment can be as simple as using reflective surfaces to maximize light exposure or setting up temporary barriers to shield your plants from pests and wind.
Soil Selection and Preparation
Choosing the right soil is another vital step to ensure your cannabis plants thrive. Look for soil that is light, airy, and nutrient-rich. Cannabis prefers well-draining soil to avoid waterlogging and root rot. You can purchase cannabis-specific soil from gardening stores or create your mix using ingredients like peat moss, perlite, and compost.
When it comes to organic vs. non-organic soil, each has its benefits. Organic soil is generally considered better for producing high-quality, flavorful buds because it relies on natural fertilizers and beneficial microbes. However, it can be more complicated to manage. Non-organic soil, often enhanced with synthetic nutrients, can be easier for beginners but might not yield the best-tasting weed.
Preparing and conditioning your soil before planting is essential. Start by mixing in organic matter such as worm castings or compost to boost nutrient content. Ensure the soil has the right pH balance, typically between 6.0 and 7.0 for cannabis. You can test this using a simple pH kit. Proper preparation can make a massive difference in the health and yield of your plants.
Planting Seeds or Clones
Step-by-step Guide to Planting Seeds or Clones
- Germinate Your Seeds:
- Start by placing your seeds between two damp paper towels.
- Place the paper towels in a dark, warm place like a cupboard or drawer.
- Check daily to ensure the towels stay moist, but not soaking wet.
- After a few days, you should see tiny roots emerging from the seeds.
- Prepare Your Soil:
- Fill small pots (ideally biodegradable) with your prepped soil mix.
- Make small holes about half an inch deep for seeds or slightly larger for clones.
- Plant the Seeds or Clones:
- For seeds, gently place the germinated seed root-down into the hole and cover lightly with soil.
- For clones, place the clone’s root ball into the hole and gently firm the soil around it.
- Watering:
- Water the soil lightly immediately after planting to help settle the soil around the roots.
- Ensure the soil remains moist but not constantly wet to prevent root rot.
- Monitor and Adjust:
- Place your pots in a location with plenty of natural light or under grow lights.
- Keep a close eye on the moisture levels, temperature, and light conditions.
- As the plants grow, consider repotting into larger containers to give roots more room to expand.
Germinating Cannabis Seeds Naturally
Germinating cannabis seeds naturally is a straightforward process that lets you kickstart your grow without needing fancy equipment.
The paper towel method is quite popular: simply dampen two paper towels, sandwich your seeds between them, and place them in a warm, dark spot. The ideal conditions for germination are around 70-80°F (21-27°C). Within a few days, you should see little white roots sprouting from the seeds, signaling they’re ready to be transferred to soil.
This method is easy, efficient, and provides a high success rate, even for beginners.
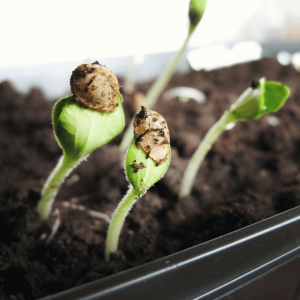
Transferring Seedlings to the Soil
Once your seeds have germinated, it’s time to move them to their new home in the soil. Carefully take the sprouted seeds and plant them root-down into small prepped pots filled with nutrient-rich soil. If you’ve used biodegradable pots, transferring the entire pot is an option that can reduce transplant shock.
Be gentle during this process to avoid damaging the delicate roots. Water immediately after transferring, ensuring that the soil is moist but not soggy. Place the pots in a well-lit area, and soon you’ll see your seedlings break through the soil, reaching for the light.
This careful handling at the beginning will help your plants establish strong roots, setting the stage for healthy growth.
Watering Techniques
Getting the watering right is crucial for growing healthy cannabis plants. Aim to water your plants thoroughly but infrequently, allowing the soil to dry out between watering sessions. This helps to encourage strong root development.
The amount of water needed will depend on the size of your plants and the weather conditions. Smaller plants and cooler weather require less water, while larger plants or hot, dry conditions will necessitate more frequent watering.
When it comes to the type of water, rainwater is often the best option as it is naturally soft and free of added chemicals. If rainwater isn’t available, you can use tap water, but allow it to sit out for 24 hours to let any chlorine evaporate.
Be cautious of overwatering, as it can lead to root rot, and make sure to avoid underwatering, which can stress the plants and hinder their growth.
Nutrient Needs Without Store-Bought Fertilizers
Cannabis plants can thrive without store-bought fertilizers if you provide them with rich, natural nutrient sources.
Compost is fantastic for this, as it’s full of decomposed organic matter that delivers a balanced nutrient profile to your plants. Kitchen scraps, like vegetable peels and coffee grounds, can be composted over time to create this nutrient-rich compost.
Additionally, homemade nutrient teas, made by steeping compost or aged manure in water, can offer your plants an instant nutrient boost. Organic mixtures, such as using bone meal for phosphorus or fish emulsion for nitrogen, can also be effective.
Keep an eye out for signs of nutrient deficiencies, like yellowing leaves or stunted growth, and address them promptly. For example, yellowing leaves often indicate a nitrogen deficiency, which can be corrected with a dose of compost tea or blood meal. By staying vigilant and adjusting your plant care, you can manage their nutrient needs naturally.
Managing Pests and Diseases Naturally
Keeping pests and diseases at bay is essential for healthy cannabis plants, especially if you’re aiming for a natural, organic grow. T
he first step is identifying common culprits like spider mites, aphids, and powdery mildew. You’ll usually notice signs like discolored leaves, webbing, or a white powdery substance on the foliage.
Homemade remedies, such as neem oil or a simple soap and water solution, can be effective against these pests. Natural pest control methods like introducing beneficial insects, such as ladybugs or predatory mites, can also keep harmful bugs in check.
To prevent these problems from taking root, regular inspection of your plants is crucial, along with maintaining a clean growing environment. Companion planting with herbs like basil and mint can also deter pests and bolster your plant’s health.
Pruning and Training Techniques
Pruning is super important for ensuring your cannabis plants grow well and produce a good yield. By carefully removing excess leaves and branches, you allow more light and air to reach the lower parts of the plant, which can improve overall growth and reduce the risk of mold.
Low-Stress Training (LST) methods, such as gently bending branches and tying them down, help to create an even canopy, leading to better light distribution and potentially higher yields.
Techniques like topping and dimming, where you cut above nodes to promote bushier growth, can also increase the number of colas and hence the amount of bud your plant produces. These methods, when done correctly, can significantly enhance the quality and quantity of your harvest.
Utilizing Natural Light Effectively
Maximizing exposure to sunlight is crucial for the healthy growth of cannabis plants.
Position your plants where they can receive the most direct sunlight throughout the day. South-facing locations are typically ideal, as they maximize sunlight exposure.
Seasonal considerations play a significant role in outdoor growing. For example, planting in the spring allows the cannabis plants to take full advantage of the long summer days, leading to robust vegetative growth.
As for light cycles, cannabis plants are photoperiod-sensitive. This means the transition to flowering is triggered by a change in the amount of light they receive. Typically, a reduction to around 12 hours of daylight and 12 hours of darkness instigates the flowering phase.
Temperature and Humidity Management
Ideal temperature and humidity conditions are vital for cannabis plant health. During the vegetative phase, maintaining temperatures between 70-85°F (21-29°C) with a relative humidity of 40-70% supports vigorous growth. In the flowering phase, slightly cooler temperatures (65-80°F or 18-26°C) and lower humidity (30-50%) are preferred to reduce the risk of mold.
To manage environmental factors naturally, consider using shade cloths or strategic planting to control heat, and water sources or mulches to retain moisture. Recognizing signs of heat stress (such as leaf curling or browning) and cold shock (stunted or discolored growth) enables swift action to mitigate adverse effects, ensuring your plants remain healthy and productive.
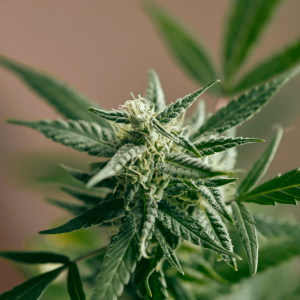
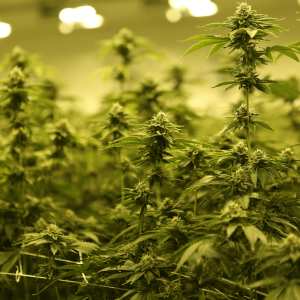
Flowering Stage: What to Expect
Transitioning from the vegetative to the flowering stage is an exciting time in your cannabis plant’s life cycle.
Natural indicators that your plants are ready to flower include the presence of pre-flowers, which are small, hair-like structures that appear at the nodes. Another sign is the change in light cycle; as the days grow shorter, your plants will naturally begin to flower.
Managing this stage without synthetic aids involves paying close attention to light schedules—aim for 12 hours of light and 12 hours of darkness. To ensure a smooth flowering phase, continue using organic nutrients like compost teas and maintain optimal environmental conditions. Keep an eye out for signs of pests or disease, as a healthy plant will produce the best buds.
Regular pruning to remove any dying leaves and selective defoliation can help improve air circulation and light penetration, ensuring your flowers get the energy they need to thrive.
Harvesting Your Plants
Knowing when to harvest your cannabis plants is crucial for ensuring high-quality buds.
The best way to determine the right time to harvest is by examining the trichomes, the tiny resin glands on the flowers. Using a magnifying glass, look for trichomes that have a milky white appearance, which signals peak potency.
When it comes to harvesting with minimal equipment, a pair of sharp scissors and some gloves will do the trick. Carefully cut the branches and trim away the larger fan leaves. Once harvested, you’ll need to handle the plants gently and start the initial drying process by hanging the branches upside down in a cool, dark, and well-ventilated space.
Maintaining a temperature of around 60-70°F (15-21°C) with humidity levels between 45-55% will allow your plants to dry evenly, setting the foundation for a smooth curing process.
Drying and Curing Cannabis
Drying and curing cannabis are crucial steps in ensuring the buds’ potency, flavor, and overall quality. Proper drying methods, such as hang drying in a controlled environment or using the natural warmth of the sun, remove excess moisture from the buds, preventing mold and preserving the cannabinoid content.
For a proper cure without fancy equipment, follow these simple steps:
- Trim buds: Remove excess leaves to improve airflow.
- Hang dry: Suspend branches upside down in a cool, dark, and well-ventilated space.
- Monitor conditions: Keep the temperature between 60-70°F (15-21°C) and humidity at 45-55%.
- Jar cure: Once dried, place buds in airtight jars, burping them daily to release moisture and prevent mold.
- Regular checks: Inspect buds for mold and ensure they are evenly drying.
Storing Your Cannabis
Storing your cannabis properly is key to maintaining its freshness, potency, and flavor over the long term. For the best results, keep your cannabis in a cool, dark place, as excessive light, heat, and humidity can degrade the cannabinoids and terpenes.
Glass jars with airtight seals make excellent storage containers, as they help preserve the flower’s quality without letting in much air. If you’re looking for a natural or homemade option, consider using ceramic containers or wooden boxes lined with food-safe materials to minimize air and light exposure. Always avoid plastic bags or containers, as they can lead to moisture build-up and mold.
Periodically checking your stored cannabis for signs of mold or degradation ensures you catch any issues early, keeping your stash fresh and enjoyable.
Conclusion
In summary, successfully growing cannabis at home without fancy equipment hinges on understanding key aspects such as optimal sunlight, temperature, and humidity management, recognizing the natural indicators of the flowering stage, and knowing when and how to harvest your plants. Cannabis delivery services can provide you with quality seeds and supplies to get started.
By following these straightforward steps, you can enjoy the rewarding experience of cultivating cannabis naturally. Don’t be afraid to experiment and adapt to what works best for your environment. Sustainable and equipment-free cannabis cultivation not only benefits you with high-quality, home-grown buds but also promotes a deeper connection to your plants and the environment. Happy growing!
Frequently Asked Questions
1. Do you need equipment to grow weed?
No, you don’t need fancy equipment to grow weed. You can cultivate cannabis naturally using sunlight and organic practices. For temperature and humidity control, you can use simple methods like shade cloths and water sources around your plants. Regular attention and care, such as checking for pests and proper pruning, can ensure healthy growth without the need for advanced technology.
2. What are the best natural nutrients for cannabis plants?
Organic nutrients like compost teas, worm castings, and manure are excellent for cannabis plants. These natural options enrich the soil with essential nutrients and microorganisms that promote strong and healthy growth. You can easily make compost tea at home by steeping compost in water, creating a nutrient-rich brew for your plants.
3. How do I prevent pests without using chemicals?
Preventing pests can be managed through natural methods such as introducing beneficial insects like ladybugs or using neem oil, which is a natural pesticide. Keeping your growing area clean and free of debris also helps, as it reduces places where pests can hide. Additionally, companion planting with herbs like basil or marigold can deter pests effectively.
Jenna Renz
Jenna is a California-based creative copywriter who’s been lucky enough to have worked with a diverse range of clients before settling into the cannabis industry to explore her two greatest passions: writing and weed.