Rewards


So, you’re curious about homemade bongs. Or, more specifically, how to make a bong. Well, you’ve come to the right place.
Let’s begin with the basics: A bong is a water pipe commonly used for smoking herbs, particularly cannabis. It’s designed to cool and filter smoke through water, making for a smoother hit and a more enjoyable experience.
The appeal of making your own bong is pretty strong—it’s not just about saving a few bucks; it’s about embracing your creativity and crafting something unique that fits your style. Plus, the satisfaction of puffing on something you built yourself? That’s hard to beat!
Before you dive in, though, there are a few safety precautions to keep in mind. Always ensure you’re using safe, non-toxic materials that can withstand heat. Be careful with tools and sharp objects, and take your time to avoid accidents.
In this blog, we’ll walk you through the basics of creating your own gravity bong at home. We’ll cover everything from choosing the right materials to essential tools you might need, and we’ll throw in some handy tips to ensure your homemade piece delivers a great smoking experience. Whether you’re a seasoned pro or a curious newbie, we’ve got you covered, so let’s get started!
Materials Needed
Alright, let’s talk about what you’ll need to gather up for your homemade bong. Don’t worry, it’s not rocket science, and most of the materials can be found around your house or at your local store.
Here’s a rundown of the essentials and some fun extras for when you want to add a personal touch.
Common Materials
- Plastic Bottle Bong: This is a classic choice, and most of us have one lying around. A 1-liter bottle works great, but feel free to experiment with different sizes. Just make sure it’s sturdy enough to handle some heat.
- Bowl: This is where all the magic happens. You can use metal bowls from old pipes, or even make one from a socket. Just ensure it’s heat-resistant!
- Downstem: This is the tube that connects the bowl to the water in the bong. You can opt for a ready-made downstem if you have one, or create your own from a sturdy straw or a piece of tubing that fits well with your bottle.
- Water: You’ll need enough to submerge the bottom of the downstem. It helps cool down the smoke and adds that smooth hit we’re all after.

Optional Materials for Customization
Now, let’s get a bit creative! This is where you can give your bong a flair that speaks to you:
- Paint: Grab some non-toxic spray paint or acrylics to add a splash of color to your bottle. Just make sure the paint is safe and doesn’t chip away easily!
- Stickers: A fun way to personalize your creation, just stick on some cool decals or designs that reflect your personality.
- Foil: If you’re in a pinch and can’t find a bowl, you can fashion a makeshift one out of aluminum foil. Just shape it into a small bowl and poke some holes for airflow.
With these materials, you’re all set to create a functional and stylish bong that’s completely your own! So, gather your supplies, and let’s get to crafting!
Choosing the Right Bottle
When learning how to make a bong, the bottle you choose definitely sets the tone for your smoking experience.
There are a couple of popular options to create your water bottle bong—plastic and glass—each with their own features and quirks.
Types of Bottles: Plastic vs. Glass
Plastic Bottles
A plastic water bottle is the go-to choice for many DIY-ers, mainly because they’re easy to find and typically don’t require any elaborate planning. They’re lightweight, durable, and won’t shatter if you drop them, which is a bonus if you’re a bit clumsy.
However, they can affect the taste of your smoke; some plastics can release harmful toxins when heated. It’s super important to pick a bottle that’s safe for heat—look for types labeled as BPA-free.
Glass Bottles
On the other hand, if you’re looking for that classy aesthetic and a cleaner taste, a glass bottle is hard to beat. They’re less likely to alter the flavor of your smoke since glass doesn’t release harmful substances. Plus, you can find some really cool glass bottles that fit the bill!
While they’re visually appealing and can give you a smoother hit, they’re also a bit more fragile, so you’ll need to handle them with care.
Ideal Size and Shape for Effective Filtration
As for size and shape, you want to aim for something that’s around 1 to 2 liters in volume. A wide base helps keep it stable and gives the smoke plenty of room to bubble through the water, which enhances filtration.
Rounded bottles often provide better airflow, but don’t shy away from experimenting with different designs—you might find something that feels just right!
Pros and Cons of Each Type of Bottle
- Plastic Bottles
Pros: Lightweight, durable, affordable
Cons: Potential toxin release, may affect taste
- Glass Bottles
Pros: Cleaner taste, aesthetic appeal
Cons: Fragile, can be pricier
Ultimately, creating a basic water bottle bong comes down to the right material. And the right material might come down to personal preference and the experience you want to create. Just keep in mind the safety tips, and you’ll be on your way to crafting a homemade bong that suits your style!

Preparing the Bottle


Getting your bottle ready is a crucial step in creating your homemade bong, and it’s super easy!
First things first, you’ll want to give that bottle a good clean. If you’re using a recycled plastic or glass bottle, rinse it out with hot water to remove any residue or lingering smells. If it had sugary drinks in it, a little dish soap can help to get rid of any stickiness. Once you’ve scrubbed it, give it a thorough rinse to ensure there’s no soap left behind—nobody wants a soapy hit!
Next up is making the small hole for your downstem. You’ll need a few tools for this part: a lighter or soldering iron (if you’re using plastic), and a sharp object like a knife or a drill (for glass). If going the plastic route, carefully heat the tip of your lighter and gently melt a hole near the bottom side of the bottle. Start small—about the size of a pencil—and gradually widen it to fit your downstem snugly. For glass bottles, you might want to use a glass drill bit to avoid shattering. Mark where you want the downstem to go, and drill gently until you’ve got a good-sized hole.
Now, once your hole is ready, it’s all about ensuring that tight seal for the downstem. You want to minimize any air leaks! A rubber grommet works great here—just push the downstem through the grommet and into the hole you’ve made. This will ensure a snug fit and make your smoking experience smooth and enjoyable. If you don’t have a grommet, you can use tape or silicone sealant to help secure it in place, creating a barrier against any unwanted airflow.
With these steps, your bottle should be prepped and ready for action—let’s keep going!
Making the Downstem
Creating a downstem for your homemade bong can be a fun DIY project using items you likely already have around the house.
The downstem plays a crucial role as it connects your bowl to the water, allowing the smoke to travel through and cool down before you inhale. Let’s dive into how you can craft one using various materials.
Household Items for Downstem Creation
- Straws: One of the simplest options is a sturdy plastic or silicone straw. Just cut it to your desired length, making sure it’s long enough to reach below the water line without being too long to cause discomfort. If you have metal straws lying around, those can work too!
- Old Pens: If you’ve got a pen without ink, you can easily disassemble it and use the hollow tube as a makeshift downstem. Just make sure it fits well with your bowl and reaches into the water.
- Dishwasher-safe Tubing: Any food-safe tubing, like those used in siphoning liquid, can also do the trick. Look for something that fits snugly and guarantees a smooth airflow.
Choosing the Right Material
When selecting a material for your downstem, consider metal, glass, or plastic.
Metal options, like an old pipe or even a small piece of durable tubing, are great for durability but may require additional cleaning. Glass is perfect for a clean smoking experience but can be fragile. Plastic is often the easiest and safest option when it comes to DIY, but remember to ensure it’s heat-resistant.
The Importance of Angle and Length
The angle and length of your downstem are crucial for optimal airflow. A downstem that’s angled downward helps the smoke travel smoothly into the water, promoting effective filtration and cooling.
Ideally, you want the end of the downstem to be just below the water’s surface to maximize the bubbling effect while ensuring it isn’t too short. So, take your time to experiment with different lengths and angles to find what feels right for your setup—it’s all about customizing your experience!
Creating the Bowl
The bowl is the heart of your homemade bong—it’s where you’ll pack your herb for that perfect hit. Its main job is to hold your smoking material while allowing smoke to travel down through the downstem and into the water for filtration. Having a well-made bowl not only ensures a smoother experience but also helps with even burning and effective airflow.
So, how do you create a bowl using items you already have at home? There are a few fun and simple methods!
Common Household Items for Bowl Creation
- Aluminium Foil: One of the easiest methods is to use a piece of aluminum foil. Start by tearing off a square piece, then gently shape it into a small cup-like structure that can sit snugly on top of your downstem. Make sure to poke a few tiny holes in the bottom of the aluminum foil bowl for airflow. Just be cautious not to make the holes too big; you don’t want your herb falling through.
- Fruit: For a fresher approach, you can use an apple or a pear! Just remove the core to create a bowl shape on top for your herb. Carve a small hole on the side to insert your downstem, and voilà! You have a fruity bowl that’s not only functional but tasty too.
- Old Pen Caps: If you have some old pen caps, these can work in a pinch. Just poke a couple of holes for airflow, and securely place it atop your downstem.
Ensuring a Secure Fit
No matter what you use for your bowl, making sure it fits securely on your downstem is essential. This prevents any air leaks that could disrupt your smoking experience.
If you’re using foil, be attentive to how you shape it to fit snugly. With fruit, press the downstem in gently but firmly. For pen caps, make sure they’re not too loose or wobbly. If you feel like your bowl isn’t secure enough, a bit of tape or silicone sealant can help seal any gaps.
Creating the perfect bowl is all about creativity and ensuring it’s functional; so experiment and have fun with it!
Assembling Your Bong
Now that you’ve got all your components ready—from the bottle to the downstem and bowl—it’s time to bring everything together! Here’s a step-by-step guide to assembling your homemade bong for a smooth and enjoyable smoking experience.
Step-by-Step Assembly
- Start with the Bottle: Make sure your bottle is clean and dry. Place it upright on a stable surface—this will be the base of your bong.
- Insert the Downstem: Take your carefully crafted downstem and insert it into the hole you made earlier. Ensure that it’s angled downward for optimal airflow. The end of the downstem should sit just below the waterline for the best filtration.
- Secure the Downstem: Once you’re happy with the placement, check to see if it fits snugly. If it seems loose, use a rubber grommet, tape, or silicone sealant to seal around the edges and prevent air leaks.
- Add the Bowl: Now, it’s time to place your bowl on top of the downstem. Whichever material you chose, ensure it sits securely without wobbling. If it’s not a tight fit, adjust it until you feel confident it won’t shift while you’re using it.
- Fill with Water: Carefully fill your bottle with water, making sure that the downstem is submerged enough to create that bubbling effect but not so deep that it drowns the bowl.
Tips for a Great Fit
When assembling, take your time to ensure both the downstem and bowl fit properly. Test their stability before filling with water or packing your herb. If you find any air gaps, you can always add tape or silicone to secure it further.
Testing for Leaks
Before you dive into your smoking session, it’s essential to test for leaks. Draw gently from the mouthpiece; if you see bubbles coming from the downstem, that’s a sign of an air leak. If you notice any, you’ll need to adjust the downstem’s fit or add more sealant until you achieve a secure, leak-free setup.
With everything assembled and leak-tested, you’re ready to enjoy your creation! Relax, have fun, and remember, it’s all about taking your time and enjoying the process.
Adding Water
When it comes to using your homemade bong, getting the water level just right is key for a smooth and enjoyable smoking experience.
Ideally, you’ll want to add enough water to submerge the end of the downstem, typically just below the surface. This ensures that the smoke has ample opportunity to bubble through the water, which filters out some impurities and cools down the smoke for a smoother hit. A good rule of thumb is to fill the bottle until the water is about an inch above the downstem’s opening.
To check your water level, take a peek through the mouthpiece before you pack your herb. You can also gently draw through the mouthpiece; if you feel air resistance but don’t see bubbles coming from the downstem, you might need to add a little more water.
Water is important in a bong for a couple of reasons. Not only does it help to filter out particulate matter, but it also cools the smoke, reducing the harshness that can irritate your throat. So, taking a bit of extra time to perfect the water level can really enhance your smoking experience, making it both smoother and more enjoyable!
Personalizing Your Bong
When it comes to making your homemade bong truly yours, the options for customization are endless and can really reflect your personality and style. One of the simplest ways to add a personal touch is through painting. Using non-toxic paint, you can unleash your inner artist and cover your bong with bright colors or intricate designs that catch the eye. Just be sure to avoid any surfaces that come into direct contact with smoke, so the paint doesn’t affect your experience.
Another fun option is to use stickers. These come in various themes, from quirky quotes to vibrant graphics, and you can easily switch them out whenever you feel like a change. Plus, stickers are great for adding layers of personality without fussing too much about the underlying surface. Just remember to pick ones that can withstand a little moisture and ensure they won’t peel off with use.
However, while personalizing your bong can make it visually striking, don’t forget about functionality. Some decoration methods might impact how well your bong operates. For instance, adding too much weight or using materials that obstruct airflow can affect your hits. It’s essential to balance aesthetics and practicality; your customizations should enhance your experience rather than hinder it.
Ultimately, creating a visually appealing and functional piece is all about enjoying the process. Whether you’re going for a vibrant masterpiece or a sleek, minimalist look, take your time to think about how each feature will blend into your smoking routine.
Remember, a personalized bong not only showcases your creativity but can also make each session feel a bit more special! So, explore these ideas and bring your unique flair to life!
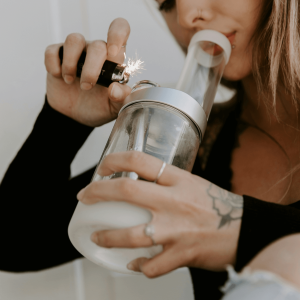
How to Use Your Homemade Bong
Now that you’ve assembled and personalized your homemade bong, it’s time to get down to business and enjoy it!
Using a bong can feel a bit tricky at first, but don’t worry—we’ve got some beginner-friendly tips to help you pack, light, and inhale like a pro.
Packing the Bowl
Start by choosing your favorite herb. Take a small pinch and break it up, this makes it easier to pack evenly. Fill the bowl loosely; you want it to be snug but not so tight that air can’t flow through.
A good rule of thumb is to leave a bit of space at the top to prevent any bits from flying out when you inhale. Once packed, you’re all set for the fun part!
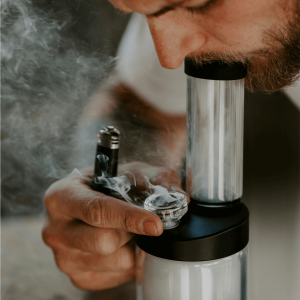
Lighting the Bowl
Position your mouth on the mouthpiece while holding the bong steady with one hand. Use your other hand to hold a lighter or a torch lighter to ignite the herb.
As you light it, gently inhale through the mouthpiece. This will draw the smoke from the bowl through the water chamber, cooling it down and making for a smoother hit. Be careful to avoid torching your fingers!
Proper Inhalation Techniques
It’s important to inhale slowly and steadily; this helps to fill the chamber with smoke without creating too much harshness. Once you feel the smoke in your lungs, you can either hold it for a second or two (if that’s your thing) or exhale right away.
Everyone’s lungs are different, so find what feels comfortable for you.
Clearing the Chamber
After a hit, you’ll want to clear the chamber to enjoy the full experience. To do this, remove the bowl from the downstem while inhaling deeply. This allows fresh air to rush in, clearing out any smoke left in the chamber. It’s important to take your time here; rushing can lead to a cough!
With these tips in your back pocket, you’re all set to vibe and enjoy your homemade bong. Happy smoking!
Maintenance and Cleaning
Keeping your homemade bong clean is crucial for both its longevity and your health. Regular cleaning not only prevents the buildup of resin and grime but also ensures that each hit is smooth and flavorful. A dirty bong can affect the taste of your herb and may even pose health risks, as harmful bacteria can thrive in stagnant water. By staying on top of your cleaning routine, you’ll not only extend the life of your bong but enhance your overall smoking experience.
To clean your bong effectively, start by emptying the old water and rinsing the parts with warm water to remove any loose debris. For a thorough deep clean, disassemble your bong if possible, separating the bowl, downstem, and any other removable components. Using a mixture of warm water and a gentle dish soap, scrub the surfaces with a soft brush or cloth. For those hard-to-reach spots, consider using cotton swabs or pipe cleaners.
For a more robust cleaning solution, you might opt for isopropyl alcohol and coarse salt. The alcohol acts as a solvent, breaking down the sticky residue, while the salt acts as an abrasive to scrub away the grime. Just shake the mixture vigorously in your bong until it’s sparkling clean, then rinse thoroughly to remove any leftover residue.
If you’re keen on ready-made products, there are plenty of specialized bong cleaners available on the market, like Orange Chronic or 420 Cleaning Solution, specifically designed to tackle tough stains without compromising the integrity of your bong. However, homemade solutions are often just as effective, budget-friendly, and free of harsh chemicals.
Ultimately, whether you choose store-bought or DIY methods, make it a habit to clean your bong regularly—aim for once a week or after every few uses—to maintain a safe and enjoyable smoking experience!
Troubleshooting Common Issues
Even with the best intentions, your homemade bong can sometimes throw a few curveballs your way. Common issues like leaks or difficulty drawing can be frustrating, but don’t worry—most problems have simple fixes.
If you notice leaks, start by checking the seals between the downstem and the bong body, and ensure that everything fits snugly. If your downstem or bowl doesn’t fit properly, consider using a small piece of food-safe silicone or electrical tape to create a tighter seal. Just be careful not to obstruct airflow!
Speaking of airflow, if you find it hard to take a hit, you might need to adjust the bowl’s packing density. Packing it too tightly can block the air from flowing through, while packing it too loosely can result in the herb burning unevenly. Experiment with textures to find that sweet spot!
Lastly, ensure that the water level is just right—not too high, so it splashes, but enough to filter the smoke effectively. With these troubleshooting tips, you’ll be back to enjoying smooth hits in no time!
Conclusion
Creating your own homemade bong can be an exciting project that goes beyond just the smoking experience. Not only does it allow you to showcase your creativity and personal style, but it also comes with the added benefit of knowing exactly how your device works.
By customizing your bong, you can tweak it to fit seamlessly into your smoking routine, making each session feel special. So don’t hesitate to experiment with various materials and designs—have fun with it! Try out unique shapes, colors, or even incorporate themes that resonate with you.
However, as you enjoy the perks of your homemade creation, remember to practice safety and moderation. Understand your limits and always ensure you’re in a comfortable environment when using your bong. Regular maintenance is just as important; it keeps your sessions smooth and enjoyable.
Ultimately, making your own bong not only enhances your smoking practice but also adds an element of enjoyment and personal satisfaction that mass-produced options just can’t provide. So roll up your sleeves, get creative, and dive into this fun project!
How to Make a Bong: Frequently Asked Questions
1. Can you build a bong?
Absolutely, you can build a bong! In fact, creating a homemade bong can be a fun and rewarding DIY project. All you need are a few materials you might already have lying around the house, like a plastic bottle, a bowl piece, and a downstem. The beauty of making your own is that you can customize it to fit your style and preferences. Just remember to ensure all materials are safe for use, and follow the tips shared earlier for handling and maintenance to have the best experience. Enjoy the process and happy building!
Jenna Renz
Jenna is a California-based creative copywriter who’s been lucky enough to have worked with a diverse range of clients before settling into the cannabis industry to explore her two greatest passions: writing and weed.